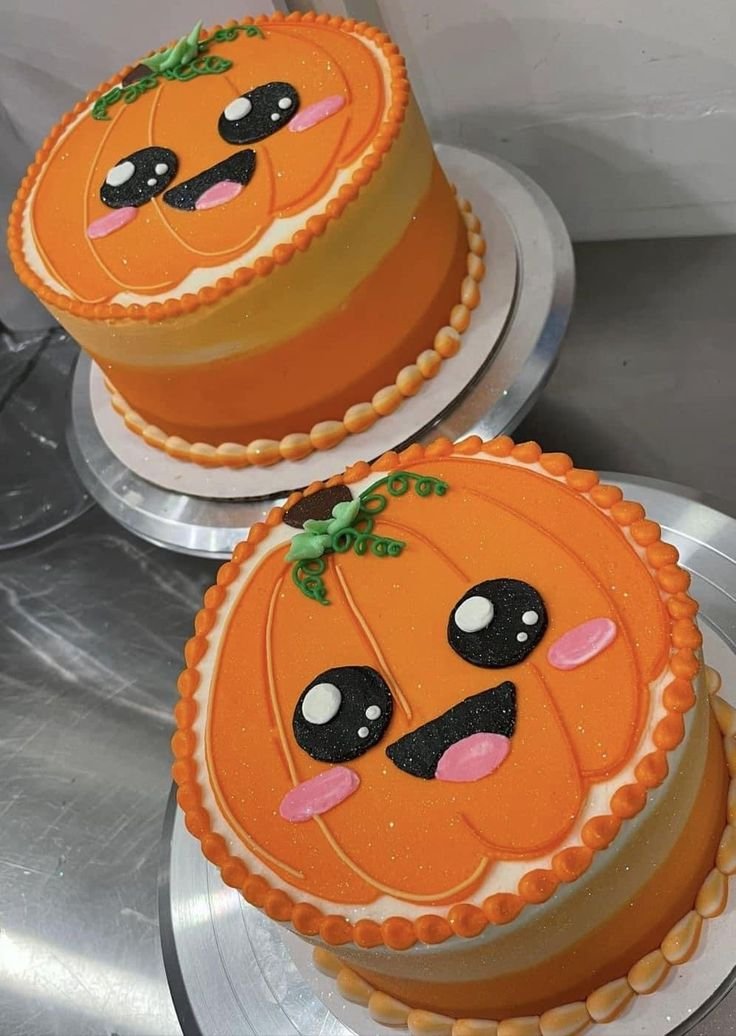
Pumpkin-shaped Halloween cakes are a delightful way to celebrate the spooky season. These charming cakes are not only visually appealing but also incredibly easy to make, making them perfect for family gatherings, school parties, or Halloween celebrations. With a moist cake base and festive frosting, they are sure to impress both kids and adults alike. Let’s dive into how to create these delightful treats!
Why You’ll Love Pumpkin-Shaped Halloween Cakes
- Fun Presentation: These cakes are perfect for Halloween gatherings, bringing a festive spirit with their playful pumpkin shape. They make for an eye-catching centerpiece on any dessert table.
- Easy to Make: Even if you’re a beginner in the kitchen, these cakes require simple ingredients and straightforward instructions, making them accessible for everyone.
- Versatile Flavor Options: While traditional pumpkin spice is a classic, you can easily adjust the flavor by incorporating chocolate, vanilla, or even spice variations that suit your taste.
- Family-Friendly Activity: Decorating these cakes can be a fun activity for the whole family. Involve your kids in the frosting and decorating process for a memorable baking experience.
- Perfect for Meal Prep: These cakes can be made in advance and stored, making them a convenient choice for holiday baking without the last-minute rush.
Recipe Overview
- Prep Time: 20 minutes
- Cook Time: 30 minutes
- Total Time: 50 minutes
- Servings: 12
- Difficulty Level: Easy
Ingredients You’ll Need for Pumpkin-Shaped Halloween Cakes
-
For the Cake:
- 2 cups all-purpose flour
- 1 ½ cups granulated sugar
- 1 cup pumpkin puree
- 1 cup vegetable oil
- 3 large eggs
- 1 tsp baking powder
- 1 tsp baking soda
- 1 tsp cinnamon
- ½ tsp nutmeg
- ½ tsp salt
- 1 tsp vanilla extract
-
For the Frosting:
- 1 cup unsalted butter, at room temperature
- 3-4 cups powdered sugar
- 2-3 tbsp milk
- 1 tsp vanilla extract
- Orange and green food coloring
- Optional: candy decorations for eyes and mouths
How to Make Pumpkin-Shaped Halloween Cakes
Step 1: Prepare Your Oven and Pans
Preheat your oven to 350°F (175°C). Grease and flour two pumpkin-shaped cake pans (or any cake pans suitable for shaping) to ensure easy removal after baking.
Step 2: Mix Wet Ingredients
In a large bowl, combine the pumpkin puree, vegetable oil, eggs, and vanilla extract. Whisk until smooth and well blended.
Step 3: Combine Dry Ingredients
In another bowl, sift together the flour, granulated sugar, baking powder, baking soda, cinnamon, nutmeg, and salt.
Step 4: Combine the Mixtures
Gradually add the dry ingredients to the wet mixture, stirring gently until just combined. Be careful not to overmix, as this can lead to dense cakes.
Step 5: Bake the Cakes
Pour the batter evenly into the prepared pans. Bake in the preheated oven for 25-30 minutes, or until a toothpick inserted into the center comes out clean.
Step 6: Cool the Cakes
Allow the cakes to cool in the pans for about 10 minutes, then carefully turn them out onto a wire rack to cool completely.
Step 7: Prepare the Frosting
In a large bowl, beat the softened butter with an electric mixer until creamy. Gradually add powdered sugar and milk, alternating until you reach a smooth consistency. Mix in the vanilla extract.
Step 8: Color the Frosting
Divide the frosting into two bowls. Color one bowl with orange food coloring until you achieve your desired shade for the pumpkin. Color the second bowl with green food coloring for the leaves.
Step 9: Assemble and Decorate
Once the cakes are completely cool, place one cake layer on a serving dish. Spread a layer of frosting on top, then place the second layer on top. Cover the entire cake with the orange frosting, smoothing it out. Use the green frosting to pipe leaves and a stem on top. Decorate with candy for added fun if you like!
Tips for Success
- Measure Accurately: For the best results, use a kitchen scale to ensure you’re measuring your ingredients accurately.
- Cool Cakes Completely: Make sure your cakes are entirely cool before frosting; otherwise, the frosting can melt and slide off.
- Don’t Overmix: Stir the batter just until combined to keep the cake light and fluffy.
- Use Quality Sprinkles: If decorating with candies, choose festive shapes to enhance the Halloween theme.
- Adjust Spice Levels: Feel free to tweak spices according to your taste, but ensure not to overpower the pumpkin flavor.
Easy Variations
- Chocolate Pumpkin Cake: Substitute half of the all-purpose flour with cocoa powder for a chocolate twist.
- Gluten-Free Option: Use a 1:1 gluten-free flour mix instead of all-purpose flour.
- Add Nuts: Fold in chopped walnuts or pecans into the batter for added texture and flavor.
- Dairy-Free Version: Use plant-based milk and a dairy-free butter alternative in the frosting.
- Mini Pumpkin Cakes: Bake the batter in mini cake pans for individual-sized treats.
What to Serve with Pumpkin-Shaped Halloween Cakes
- Spiced Apple Cider: The warm spices in apple cider complement the pumpkin flavor beautifully.
- Vanilla Ice Cream: A scoop of creamy vanilla ice cream adds a lovely contrast to the spiced cake.
- Coffee or Tea: A warm drink pairs perfectly with the sweetness of the cake.
- Cheese Platter: The creaminess of cheese can balance the sweetness of the cake.
- Fruit Salad: A refreshing fruit mix adds a lightness to the dessert spread.
Storage and Reheating
- Refrigerator Storage: Store leftover pumpkin cakes in an airtight container in the refrigerator for up to 5 days.
- Freezer Storage: You can freeze frosted or unfrosted cakes by wrapping them tightly in plastic wrap and then in aluminum foil. They last up to 3 months in the freezer.
- Reheating: For best results, allow frozen cakes to thaw in the refrigerator overnight. Reheat in a microwave on low for about 15-20 seconds if you prefer a warm slice.
- Preserving Texture: When storing, ensure the cakes are not stacked to maintain their shape.
Common Mistakes to Avoid
- Baking at the Wrong Temperature: Make sure your oven reaches the correct temperature before placing the cakes in.
- Not Greasing the Pans: If you skip greasing or flouring the pans, your cakes may stick.
- Cutting Too Soon: Allow the cakes to cool completely before slicing to avoid crumbling.
- Ignoring the Toothpick Test: Always check your cakes for doneness with a toothpick to avoid undercooking.
- Using Fresh Pumpkin: Ensure you’re using pure canned pumpkin puree rather than pie filling for accurate flavors.
Pumpkin-Shaped Halloween Cakes: Background & Cultural Inspiration
Pumpkin-shaped cakes have become a fun and festive tradition, especially in regions where autumn is celebrated with harvest festivals. The pumpkin itself, a quintessential autumn squash, has deep roots in various cultural practices, symbolizing the season’s bounty and festivities. In many cultures, pumpkins are carved into jack-o’-lanterns to ward off spirits, while their rich, sweet flavor lends itself beautifully to sweet treats. This cake reflects the whimsy of Halloween and the joy of sharing delicious, themed desserts with friends and family.
Frequently Asked Questions
How can I substitute fresh pumpkin for canned?
You can use fresh pumpkin by roasting and pureeing it, but ensure to remove excess moisture for the best texture.
Can I make these cakes in advance?
Absolutely! These cakes can be baked several days ahead of time. Just store them properly to maintain freshness.
What can I use instead of eggs?
For egg substitutions, you can use flaxseed meal or applesauce. Use 1/4 cup of unsweetened applesauce or 1 tablespoon of flaxseed mixed with 2.5 tablespoons water for each egg.
How do I fix a dry cake?
If you find your cake is dry, it may have been overbaked. Next time, check for doneness a few minutes early. Adding a simple syrup can help restore moisture.
Can I use store-bought frosting?
Yes, if you’re short on time, using store-bought frosting can make the process quicker without sacrificing taste.
Final Thoughts
Pumpkin-shaped Halloween cakes are a delightful way to bring seasonal fun to your baking routine. Their easy preparation and charming presentation make them perfect for any gathering. Whether you make them for a party or a family treat, they are sure to bring smiles and joy to those who enjoy them. Try out this recipe and create some sweet memories this Halloween season!
PrintPumpkin-Shaped Halloween Cakes
Delightful pumpkin-shaped cakes perfect for Halloween gatherings, easy to make and fun to decorate.
- Prep Time: 20 minutes
- Cook Time: 30 minutes
- Total Time: 50 minutes
- Yield: 12 servings
- Category: Dessert
- Method: Baking
- Cuisine: American
- Diet: Vegetarian
Ingredients
- 2 cups all-purpose flour
- 1 ½ cups granulated sugar
- 1 cup pumpkin puree
- 1 cup vegetable oil
- 3 large eggs
- 1 tsp baking powder
- 1 tsp baking soda
- 1 tsp cinnamon
- ½ tsp nutmeg
- ½ tsp salt
- 1 tsp vanilla extract
- 1 cup unsalted butter, at room temperature
- 3-4 cups powdered sugar
- 2-3 tbsp milk
- 1 tsp vanilla extract
- Orange and green food coloring
- Optional: candy decorations for eyes and mouths
Instructions
- Preheat your oven to 350°F (175°C). Grease and flour two pumpkin-shaped cake pans.
- Combine the pumpkin puree, vegetable oil, eggs, and vanilla extract in a large bowl. Whisk until smooth.
- Sift together the flour, granulated sugar, baking powder, baking soda, cinnamon, nutmeg, and salt in another bowl.
- Gradually add the dry ingredients to the wet mixture, stirring gently until just combined.
- Pour the batter evenly into the prepared pans. Bake for 25-30 minutes, or until a toothpick comes out clean.
- Allow the cakes to cool in the pans for about 10 minutes, then turn them out onto a wire rack to cool completely.
- Beat the softened butter in a large bowl until creamy. Gradually add powdered sugar and milk, mixing until smooth.
- Divide the frosting into two bowls. Color one with orange and the other with green food coloring.
- Assemble by placing one cake layer on a serving dish, spreading frosting on top, then add the second layer. Cover with orange frosting and pipe on green frosting for leaves.
Notes
Involve your kids in decorating these cakes for a fun family activity. Ensure cakes are cool before frosting.