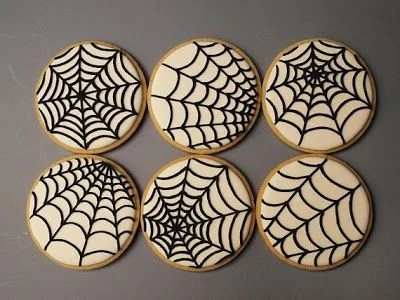
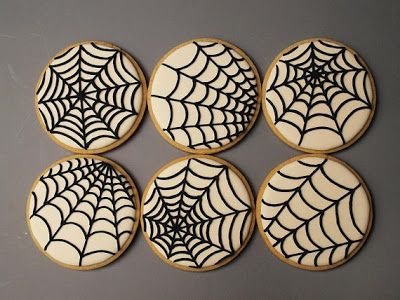
Halloween Cookies are a delightful way to celebrate the spooky season while having fun in the kitchen. These cookies are easy to make, decorated with colorful royal icing, and perfect for sharing with friends and family. Whether for a party or just to enjoy at home, these charming treats are a must for Halloween festivities.
Why You’ll Love Halloween Cookies
- Fun to Decorate: Decorating these cookies offers a creative outlet, making it a fun activity for kids and adults alike. Everyone can let their imagination run wild with colors and shapes.
- Perfect for Parties: They’re a great addition to Halloween parties or gatherings, adding a festive touch to your spread. Guests will love choosing their favorite spooky shapes!
- Easy Recipe: This recipe is simple enough for beginners, requiring only basic baking skills. You’ll have delicious cookies ready in no time.
- Versatile Decorations: You can customize your cookies to fit any theme or personal taste. From classic ghosts to colorful pumpkins, the decoration options are endless.
- Makes Great Gifts: Pack them in festive boxes or bags to share with friends and family. Homemade cookies are always appreciated and make thoughtful gifts.
Recipe Overview
- Prep Time: 20 minutes
- Cook Time: 10 minutes
- Total Time: 30 minutes (excluding cooling time)
- Servings: About 24 cookies
- Difficulty Level: Easy
Ingredients You’ll Need for Halloween Cookies
- Dry Ingredients:
- 2 3/4 cups all-purpose flour
- 1 teaspoon baking powder
- 1/2 teaspoon salt
- Wet Ingredients:
- 1 cup unsalted butter, softened
- 1 1/2 cups granulated sugar
- 1 large egg
- 1 teaspoon vanilla extract
- Decoration:
- Royal icing (for decoration)
- Food coloring (orange, black, etc.)
- Sprinkles or edible decorations
The flour gives structure and texture to the cookies, while baking powder creates a light, airy consistency. Unsalted butter ensures a rich flavor without excess salt. Feel free to swap the butter for a non-dairy alternative if needed.
How to Make Halloween Cookies
-
Preheat Your Oven
Set your oven to 350°F (175°C). This ensures an even baking temperature for your cookies. -
Mix Dry Ingredients
In a bowl, whisk together the flour, baking powder, and salt. This helps to evenly distribute the leavening agent and salt. -
Cream Butter and Sugar
In a separate bowl, cream the softened butter and granulated sugar together until light and fluffy. This process incorporates air into the mixture, which aids in achieving a soft cookie. -
Add Egg and Vanilla
Beat in the egg and vanilla extract until well combined. This adds moisture and flavor to the dough. -
Combine Ingredients
Gradually add the dry ingredients to the butter mixture. Mix just until combined to avoid overworking the dough. -
Roll Out the Dough
On a floured surface, roll out the dough to about 1/4 inch thick. Ensure an even thickness for uniform baking. -
Cut into Shapes
Use cookie cutters to cut out Halloween-themed shapes like pumpkins, ghosts, and bats. -
Bake Cookies
Place the cookies on a baking sheet lined with parchment paper. Bake for 8-10 minutes or until the edges are lightly golden. Keep an eye on them to prevent overbaking. -
Cool Completely
Allow the cookies to cool completely on a wire rack before decorating. This prevents the icing from melting. -
Decorate
Once cooled, decorate with royal icing and additional decorations as desired. Get creative and personalize each cookie!
Tips for Success
- Chill Dough for Better Shape: If the dough is too soft, refrigerate it for about 30 minutes before rolling. This helps maintain the shape of your cookies.
- Use Quality Baking Sheets: A light-colored baking sheet helps prevent cookie bottoms from browning too quickly.
- Check Doneness with Care: Look for lightly golden edges rather than waiting for the tops to brown for perfect texture.
- Practice Your Decorating: Try piping royal icing on practice sheets before decorating your cookies to refine your technique.
Easy Variations
- Spiced Cookies: Add 1 teaspoon of cinnamon or nutmeg to the dry ingredients for a warm, spiced flavor.
- Chocolate Chunk Cookies: Stir in 1 cup of chocolate chips or chunks for a chocolatey twist on your Halloween cookies.
- Sugar-Free Option: Substitute granulated sugar with a sugar alternative like erythritol, adjusting the quantity to match the sweetness level.
- Add Zest: Incorporate citrus zest, such as orange or lemon, into the dough for a refreshing twist.
What to Serve with Halloween Cookies
- Hot Chocolate: The warmth and richness of hot chocolate pair wonderfully with the sweet and chewy texture of cookies, making it a cozy treat.
- Apple Cider: Serve with warm or cold apple cider for a festive autumn combination.
- Milk: A classic pairing that enhances the cookie’s sweetness and balances rich flavors.
- Ice Cream: Serve alongside vanilla or pumpkin-flavored ice cream for a delicious dessert duo.
Storage and Reheating
- Refrigerator Storage: Store baked cookies in an airtight container at room temperature for up to one week.
- Freezer Storage: For longer storage, freeze unbaked cookie dough wrapped in plastic wrap for up to 3 months. When ready to bake, thaw in the fridge overnight before rolling out.
- Reheating: If desired, warm cookies in the microwave for 5-10 seconds to regain softness. Avoid overheating to maintain texture.
Common Mistakes to Avoid
- Overmixing the Dough: This could result in tough cookies. Mix until just combined.
- Not Measuring Flour Correctly: Use the spoon-and-level method when measuring flour for accuracy to prevent dry cookies.
- Skipping Cooling Time: Decorating warm cookies can cause the icing to melt, losing your creative designs.
Halloween Cookies: Background & Cultural Inspiration
Halloween cookies have become a staple in American culture, aligning with the celebration of Halloween, which dates back to ancient Celtic festivals. The tradition of baking cookies in fun shapes stems from the desire to celebrate the spooky season with sweet treats. Families often engage in cookie decorating as a festive activity, creating a communal experience filled with laughter and creativity. This recipe not only highlights the culinary creativity of the holiday but also brings friends and family together in festive joy.
Frequently Asked Questions
Can I make these cookies gluten-free?
You can use a gluten-free 1:1 baking flour and ensure all other ingredients are gluten-free to adapt this recipe.
How long will these cookies last?
When stored properly in an airtight container, Halloween cookies can last up to one week at room temperature.
Can I freeze decorated cookies?
Yes, but for best results, freeze them before decorating. Decorated cookies can become smudged when frozen.
What if my cookie dough is too crumbly?
If your dough is crumbly, add a teaspoon of milk or water to bring it together. Mix gently until it forms a cohesive ball.
Can I make the dough ahead of time?
Absolutely! The dough can be prepared in advance and stored in the refrigerator for up to 48 hours or frozen for later use.
Final Thoughts
Making Halloween Cookies is a wonderful way to embrace the spirit of the season while enjoying quality time in the kitchen. Not only are these cookies easy to prepare and fun to decorate, but they also invite creativity and family bonding. Whether you’re hosting a party or simply indulging in a sweet treat, these cookies are sure to delight. So roll up your sleeves, gather your ingredients, and dive into this festive baking adventure!
PrintHalloween Cookies
Delightful Halloween-themed cookies, easy to make and perfect for decorating, sharing, or gifting.
- Prep Time: 20 minutes
- Cook Time: 10 minutes
- Total Time: 30 minutes
- Yield: 24 cookies
- Category: Dessert
- Method: Baking
- Cuisine: American
- Diet: Vegetarian
Ingredients
- 2 3/4 cups all-purpose flour
- 1 teaspoon baking powder
- 1/2 teaspoon salt
- 1 cup unsalted butter, softened
- 1 1/2 cups granulated sugar
- 1 large egg
- 1 teaspoon vanilla extract
- Royal icing (for decoration)
- Food coloring (orange, black, etc.)
- Sprinkles or edible decorations
Instructions
- Preheat your oven to 350°F (175°C).
- Mix the flour, baking powder, and salt in a bowl.
- Cream the softened butter and granulated sugar until light and fluffy.
- Add the egg and vanilla extract, beating until well combined.
- Combine the dry ingredients with the butter mixture.
- Roll out the dough to about 1/4 inch thick on a floured surface.
- Cut out Halloween-themed shapes with cookie cutters.
- Bake for 8-10 minutes until the edges are lightly golden.
- Cool completely on a wire rack before decorating.
- Decorate with royal icing and creative toppings.
Notes
Chill dough if too soft to maintain shape. Use quality baking sheets and avoid overmixing.












