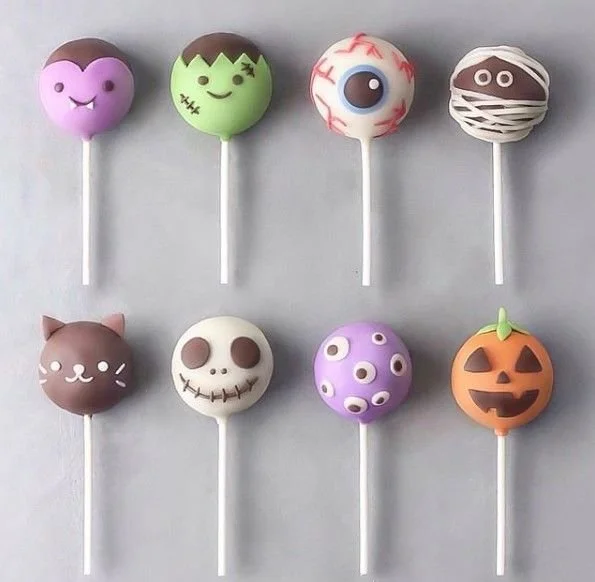
Making spooky and delicious Halloween Cake Pops is a fun way to celebrate the season, and they’re perfect for any gathering. This recipe is easy enough for even novice bakers, making it a fantastic choice for a festive treat everyone will love. With their cute designs and delightful flavors, these cake pops are sure to be a hit at your Halloween party!
Why You’ll Love Halloween Cake Pops
- Fun to Make: This recipe brings joy to the kitchen, as you can customize cake pops with vibrant decorations and spooky designs.
- Perfect for Sharing: These bite-sized treats are easy to transport, making them great for parties, school events, or as sweet gifts for friends and family.
- Customizable: Use different cake flavors or candy coatings to suit your taste, creating a unique twist each time you make them.
- Visually Appealing: The spooky designs will definitely catch attention and bring festive cheer to your Halloween celebrations.
- Perfectly Portion-Controlled: These small treats satisfy your sweet tooth without going overboard.
Recipe Overview
- Prep Time: 30 minutes
- Cook Time: 25 minutes
- Total Time: 55 minutes
- Servings: Approximately 24 cake pops
- Difficulty Level: Easy
Ingredients You’ll Need for Halloween Cake Pops
-
For the Cake:
- 1 box of chocolate cake mix (or your favorite flavor)
- Ingredients required on the cake mix box (typically eggs, oil, water)
-
For the Frosting:
- 1 cup of chocolate frosting (store-bought or homemade)
-
For the Coating:
- 2 cups of candy melts (orange and purple are perfect for Halloween)
- 1 tablespoon of coconut oil (for a smoother coating)
-
For Decoration:
- Halloween-themed sprinkles (such as ghost or bat sprinkles)
- Lollipop sticks
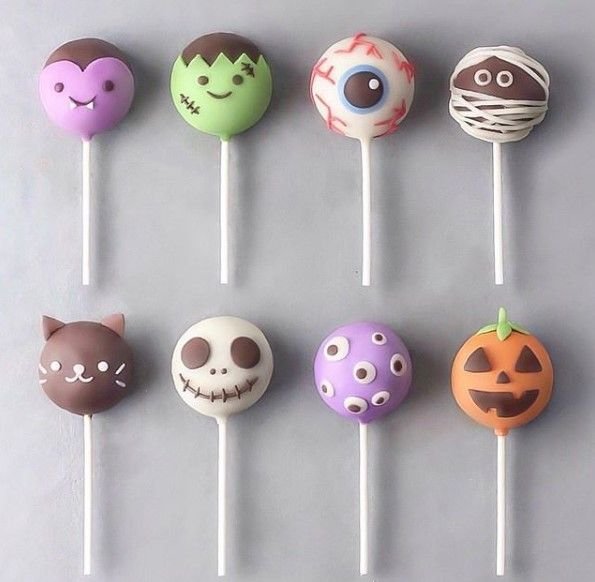
How to Make Halloween Cake Pops
-
Bake the Cake:
Preheat your oven and bake the cake according to the package directions. Allow it to cool completely. -
Crumble the Cake:
Once cooled, crumble the cake into a large mixing bowl using your hands or a fork until it resembles fine crumbs. -
Mix with Frosting:
Add the chocolate frosting to the crumbled cake. Mix well until the mixture is moist and can hold its shape. -
Shape the Cake Balls:
Take about 1 tablespoon of the mixture and roll it into a ball. Place the balls on a baking sheet lined with wax paper. Repeat until all mixture is used. -
Chill the Cake Balls:
Place the baking sheet in the refrigerator for about 30 minutes to let the cake balls firm up. -
Prepare the Coating:
In a microwave-safe bowl, melt the candy melts with coconut oil in 30-second intervals, stirring in between until smooth. -
Dip the Cake Pops:
Insert lollipop sticks into the chilled cake balls, then dip each cake pop into the melted candy coating. Tap off any excess chocolate. -
Decorate:
While the coating is still wet, sprinkle your Halloween-themed sprinkles over the pops for decoration. -
Set the Cake Pops:
Place the completed cake pops upright in a block of foam or a cake pop stand to set. Allow to harden completely.
Tips for Success
- Cool the Cake Thoroughly: Ensure the cake is completely cooled to prevent melting the frosting during mixing.
- Use Different Flavors: Experiment with different cake and frosting flavors for variety.
- Keep the Coating Warm: If the candy melts begin to harden, simply reheat them gently to keep them smooth.
- Don’t Overmix: When combining the frosting and cake, mix just until it’s fully combined to avoid a dense consistency.
- Practice Your Decoration: Take your time with the sprinkles to achieve the desired spooky look.
Easy Variations
- Flavor Swap: Use vanilla or red velvet cake for a different flavor base.
- Dairy-Free Option: Use dairy-free frosting and confectionery coating for an allergen-friendly treat.
- Nutty Surprise: Mix in chopped nuts or mini chocolate chips into the cake mixture for added texture.
- Different Shapes: Instead of balls, use cookie cutters to shape your cake pops into spooky figures before dipping.
- Flavor Coatings: Try using white chocolate dyed with food coloring for a unique twist on the coating.
What to Serve with Halloween Cake Pops
- Hot Apple Cider: The warm spices in apple cider complement the sweetness of the cake pops wonderfully.
- Halloween Punch: A bright, fruity punch adds a refreshing contrast to the rich flavors of the cake.
- Spooky Cheese Platter: Offer a variety of cheeses alongside your cake pops for a savory balance.
- Pumpkin Pie Bites: Combine sweets with these traditional autumn treats to enhance the Halloween vibe.
- Candy Corn: This classic Halloween candy adds a cheerful pop of color alongside the cake pops.
Storage and Reheating
- Refrigerator Storage: Store the cake pops in an airtight container in the fridge for up to one week.
- Freezer Storage: You can freeze uncoated cake balls for up to three months; just thaw them completely before coating.
- Reheating: There’s no need to reheat. Enjoy them chilled or at room temperature.
- Preserve Texture: Avoid stacking the cake pops to keep the coating intact and prevent sticking.
Common Mistakes to Avoid
- Using Warm Cake: Don’t dip cake pops until they are completely cooled to prevent the candy coating from melting.
- Not Chilling the Cake Balls: Skipping the chilling step can result in mishap while dipping.
- Overheating Candy Coating: Heat candy melts slowly and watch carefully to avoid burning.
- Not Tapping Off Excess: This can lead to puddles of chocolate that make the pops harder to handle.
- Heavy Decoration: Avoid piling too many sprinkles on; it can weigh down the coating and disrupt the design.
Halloween Cake Pops: Background & Cultural Inspiration
Halloween has long been celebrated as a time for spookiness, creativity, and community. Cake pops originated as a fun, bite-sized treat to simplify cake decorating and bring people together through shared activities. The tradition of creating festive treats around Halloween has roots in various cultures, often associated with harvest festivals and honoring the deceased. These cake pops merge fun and flavor, providing a playful way to celebrate while keeping the spirit of Halloween alive.
Frequently Asked Questions
How far in advance can I make Halloween cake pops?
You can prepare cake pops up to one week in advance. Store them in the refrigerator in an airtight container to maintain freshness.
Can I use homemade cake instead of box mix?
Absolutely! Homemade cake adds a personal touch and allows you to customize flavors.
What if my cake balls are too crumbly?
If the mixture feels too dry, add more frosting a tablespoon at a time until it sticks together.
Can I use chocolate instead of candy melts?
Yes, chocolate works, but you may need to temper it to achieve a nice coating that doesn’t melt easily.
How can I achieve a smooth coating?
Ensure the candy melts are melted evenly and avoid overheating. A bit of coconut oil can also help achieve a smoother finish.
Final Thoughts
Making Halloween Cake Pops is not only a delicious way to celebrate but also a creative outlet for your inner artist. Their festive appearance and customizable flavors make them a great addition to any Halloween gathering. Give this recipe a try, and watch as they disappear from the table! Whether you’re a seasoned baker or a novice, these cake pops are sure to bring joy and festivity to your celebration.
PrintHalloween Cake Pops

Make spooky and delicious Halloween Cake Pops that are perfect for any gathering. These customizable bite-sized treats are a festive addition to your celebrations.
- Prep Time: 30 minutes
- Cook Time: 25 minutes
- Total Time: 55 minutes
- Yield: 24 cake pops
- Category: Dessert
- Method: Baking
- Cuisine: American
- Diet: Vegetarian
Ingredients
- 1 box of chocolate cake mix (or your favorite flavor)
- Ingredients required on the cake mix box (typically eggs, oil, water)
- 1 cup of chocolate frosting (store-bought or homemade)
- 2 cups of candy melts (orange and purple recommended)
- 1 tablespoon of coconut oil
- Halloween-themed sprinkles (such as ghost or bat sprinkles)
- Lollipop sticks
Instructions
- Preheat your oven and bake the cake according to the package directions. Allow it to cool completely.
- Crumble the cake into a large mixing bowl using your hands or a fork until it resembles fine crumbs.
- Add the chocolate frosting to the crumbled cake. Mix well until the mixture is moist and can hold its shape.
- Take about 1 tablespoon of the mixture and roll it into a ball. Place the balls on a baking sheet lined with wax paper. Repeat until all mixture is used.
- Place the baking sheet in the refrigerator for about 30 minutes to let the cake balls firm up.
- Melt the candy melts with coconut oil in a microwave-safe bowl in 30-second intervals, stirring in between until smooth.
- Insert lollipop sticks into the chilled cake balls, then dip each cake pop into the melted candy coating. Tap off any excess chocolate.
- While the coating is still wet, sprinkle your Halloween-themed sprinkles over the pops for decoration.
- Place the completed cake pops upright in a block of foam or a cake pop stand to set. Allow to harden completely.
Notes
Ensure the cake is completely cooled before mixing to prevent melting the frosting. You can experiment with different cake and frosting flavors for variety.












