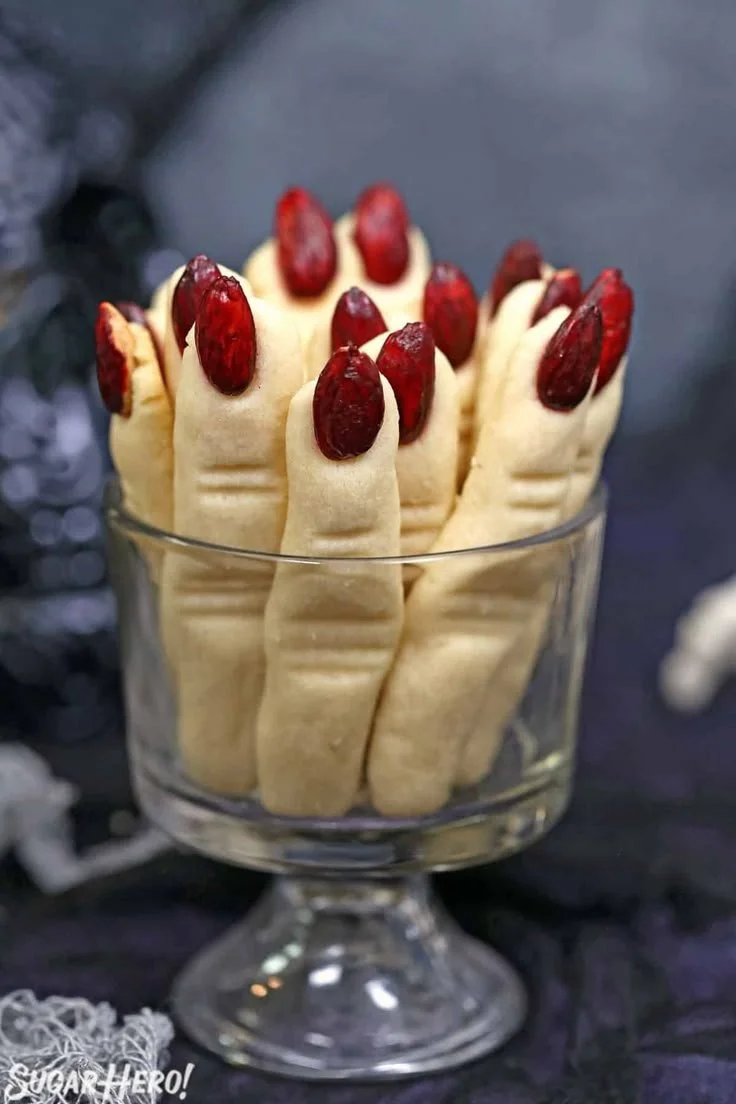
Bake Some Magic: Easy Witch Finger Cookies are a fun and spooky treat perfect for Halloween festivities. These whimsical cookies are not only easy to make, but they also provide a great opportunity for the kids to get involved. With their eerie appearance and delicious flavor, they are sure to be a hit at any gathering or celebration.
Why You’ll Love Witch Finger Cookies
- Easy to Make: This straightforward recipe requires no special skills, making it perfect for beginner bakers.
- Fun for Kids: Rolling the dough and decorating the cookies can be a fun activity for children, allowing them to unleash their creativity.
- Perfect for Halloween: These cookies add a festive touch to Halloween parties and gatherings, making them a conversation starter.
- Customizable Appearance: You can easily adjust the color and decoration options to fit your party theme, whether spooky or playful.
- Tasty Yet Creepy: With a buttery, melt-in-your-mouth texture and slightly nutty flavor from the almonds, these cookies are delicious, contrary to their frightful appearance.
Recipe Overview
- Prep Time: 20 minutes
- Cook Time: 15-20 minutes
- Total Time: 35-40 minutes
- Servings: About 24 cookies
- Difficulty Level: Easy
Ingredients You’ll Need for Witch Finger Cookies
-
Wet Ingredients:
- 1 cup unsalted butter, softened
- 1 cup powdered sugar
- 1 egg
- 1 teaspoon vanilla extract
-
Dry Ingredients:
- 2 3/4 cups all-purpose flour
- 1 teaspoon baking powder
- 1/2 teaspoon salt
-
Toppings:
- 1 cup whole almonds (for ‘fingernails’)
- Red food coloring (optional, for a creepy effect)

How to Make Witch Finger Cookies
-
Preheat the Oven
Preheat your oven to 350°F (175°C) to ensure it’s hot enough for baking. -
Cream the Butter and Sugar
In a large bowl, cream together the softened butter and powdered sugar until the mixture is light and fluffy. This may take about 3-5 minutes. -
Add Egg and Vanilla
Beat in the egg and vanilla extract until fully combined, ensuring a smooth mixture. -
Combine Dry Ingredients
In another bowl, whisk together the flour, baking powder, and salt. Gradually add this dry mixture to the wet ingredients, mixing until a cohesive dough forms. -
Shape the Cookies
Divide the dough into small pieces and roll them into long, thin shapes resembling fingers. Aim for about 3-4 inches in length. -
Add Fingernails
Press an almond into one end of each cookie to create a fingernail. Use a knife to gently create creases to mimic knuckles. -
Bake the Cookies
Place the shaped cookies on a baking sheet and bake for about 15-20 minutes, or until the edges are lightly golden. Keep an eye on them to ensure they don’t overbake. -
Add Color (Optional)
If desired, use red food coloring to paint the almonds for a more gory effect, enhancing the spooky appearance. -
Cool and Serve
Allow the cookies to cool on a wire rack before serving. They can be enjoyed warm or at room temperature.
Tips for Success
- Don’t Overmix: When combining the dry and wet ingredients, mix until just combined to maintain a tender cookie texture.
- Chill the Dough: If the dough is too soft to shape, refrigerate it for about 30 minutes before rolling.
- Watch the Baking Time: Keep an eye on the cookies as oven temperatures can vary. Look for a light golden edge.
- Precision with Almonds: Choose almonds that are similar in size for uniformity. They help create a uniform look for the ‘fingernails’.
- Use Fresh Ingredients: Make sure your baking powder is fresh to ensure proper rising.
Easy Variations
- Chocolate Chip Fingers: Add chocolate chips to the dough for a chocolaty twist.
- Spiced Flavor: Incorporate 1 teaspoon of ground cinnamon or nutmeg for a warm flavor.
- Nut-Free Option: Replace almonds with chocolate chips for a nut-free version.
- Colorful Frosting: Decorate with colorful icing after baking for a festive look.
- Different Shapes: Use cookie cutters to create other spooky shapes like ghosts or pumpkins.
What to Serve with Witch Finger Cookies
- Hot Chocolate: These cookies pair well with a warm mug of chocolate, creating a cozy atmosphere.
- Spider Web Cupcakes: Serve alongside spider web cupcakes for an eerie-themed dessert table.
- Fruit Punch: A refreshing fruit punch adds a fun, sweet contrast to these cookies.
- Cheese Board: Include a savory cheese board to balance out the sweetness of the cookies.
- Halloween Charcuterie: Assemble a charcuterie board with Halloween-themed snacks for variety.
Storage and Reheating
- Refrigerator Storage: Store cookies in an airtight container in the refrigerator for up to one week.
- Freezer Storage: Freeze cookies in an airtight container for up to three months. Thaw them at room temperature before serving.
- Reheating: Warm cookies in the oven at 300°F (150°C) for about 5 minutes to restore their freshness and texture.
- Meal Prep Note: The dough can be prepared ahead of time and stored in the refrigerator for up to 2 days before shaping and baking.
Common Mistakes to Avoid
- Skipping the Creaming Step: Don’t rush the butter and sugar creaming; it adds fluffiness.
- Not Prepping the Ingredients: Have all ingredients at room temperature for better mixing.
- Overbaking: Cookies continue to cook slightly after being removed from the oven, so take them out when they are just golden.
- Too Much Flour: Measuring flour incorrectly can lead to dry cookies; use the spoon-and-level method.
- Ignoring Cooling Time: Let cookies cool on a wire rack to maintain their texture; avoid the temptation to serve them hot right out of the oven.
Witch Finger Cookies: Background & Cultural Inspiration
The origins of Witch Finger Cookies can be traced back to the playful culinary traditions of Halloween, where creativity and spookiness blend beautifully. Often associated with folklore and tales of witches, these cookies evoke imaginations that run wild. They are a delightful representation of the holiday’s spirit, combining treats and tricks in one delicious form, offering a fun way to celebrate. The aesthetic of the spooky finger-shaped cookies exemplifies a blend of culinary art and festive fun, making them a fantastic conversation starter at Halloween parties.
Frequently Asked Questions
Can I make the dough ahead of time?
Yes! You can prepare the dough up to two days in advance and keep it refrigerated until you are ready to bake.
What if I don’t have powdered sugar?
You can make your own powdered sugar by blending granulated sugar in a food processor until fine.
Can I use margarine instead of butter?
Yes, margarine can be used as a substitute; however, it may affect the flavor and texture slightly.
How can I ensure my cookies are soft?
Make sure not to overmix the dough and avoid overbaking, as these factors can make cookies tough.
What can I use instead of almonds for the nails?
You can use chocolate chips or candied cherries for a different decorative effect.
Final Thoughts
Witch Finger Cookies are a delightful addition to your Halloween celebrations, blending fun and flavor in a way that sparks joy and creativity. Easy to make and enjoyable for all ages, these cookies are sure to be a crowd-pleaser. Whether you’re hosting a party or looking for a spooky snack, give this recipe a try—it’s an entertaining and delicious way to get into the Halloween spirit!












