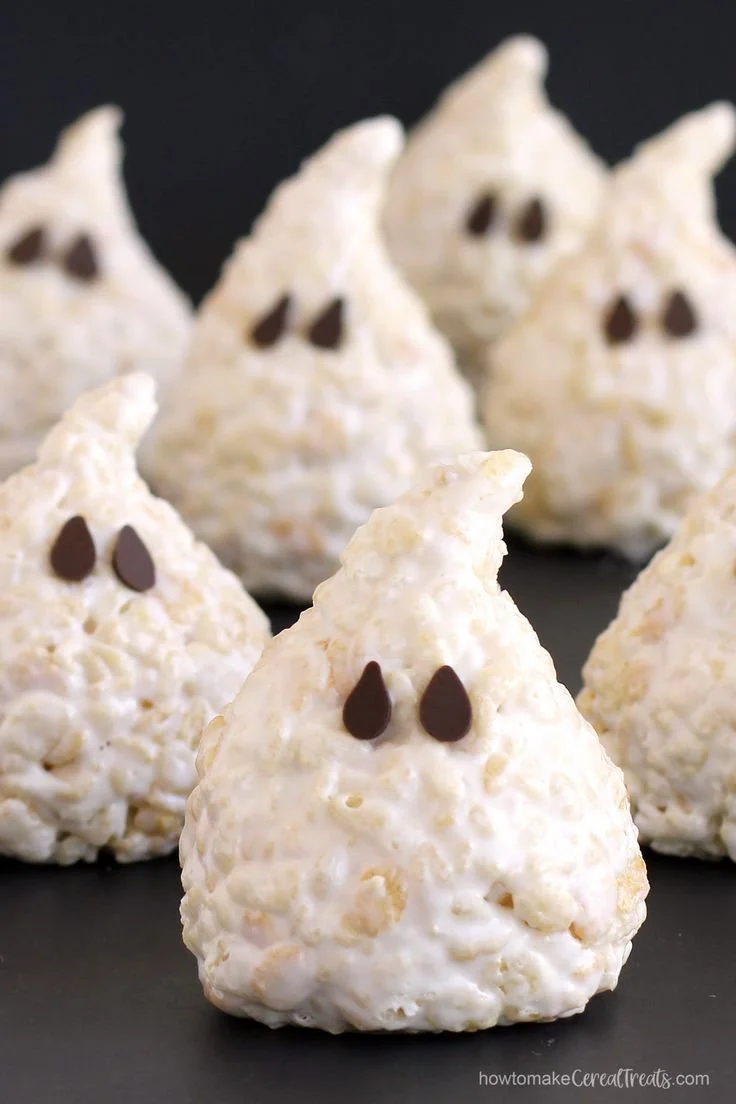
Rice Krispie Treat Ghosts are a delightful and simple way to celebrate the Halloween season. With their cute ghostly shapes and fun decorations, these treats are perfect for parties, school events, or just a festive snack at home. They bring a touch of nostalgia while being incredibly easy to make, making them an ideal recipe for beginner cooks and families alike.
Why You’ll Love Rice Krispie Treat Ghosts
- Simplicity: With just a few ingredients and minimal steps, this recipe is straightforward and doesn’t require baking, making it accessible for all skill levels.
- Fun for Kids: Shaping these treats into ghost forms is an engaging activity for children, making it a great family project.
- Customizable: You can personalize your ghosts with different decorations, such as colorful sprinkles or various chocolate designs, to match your Halloween theme.
- Quick to Prepare: From start to finish, you can have these spooky snacks ready in under 30 minutes—perfect for those last-minute party needs.
- Great for Celebrations: These treats not only taste good but also add a playful touch to any Halloween gathering, delighting both kids and adults.
Recipe Overview
- Prep Time: 10 minutes
- Cook Time: 5 minutes
- Total Time: 15 minutes
- Servings: Approximately 12 ghost treats
- Difficulty Level: Easy
Ingredients You’ll Need for Rice Krispie Treat Ghosts
- Rice Krispies Cereal: 6 cups
- Mini Marshmallows: 4 cups
- Butter: 3 tablespoons
- White Chocolate or Candy Melts: For coating
- Chocolate Chips or Black Icing: For decorating eyes and mouth
These ingredients come together to create a delightful treat with wonderfully chewy and crispy textures. The Rice Krispies contribute the crunch, while the marshmallows ensure it all sticks together nicely.

How to Make Rice Krispie Treat Ghosts
-
Melt the Butter
In a large saucepan, melt the butter over low heat. This step is essential to ensure the marshmallows melt evenly without burning. -
Add the Marshmallows
Once the butter has melted, add the mini marshmallows. Stir continuously until they are completely melted and smooth. Remove the saucepan from the heat. -
Combine with Rice Krispies
Stir in the Rice Krispies cereal, mixing until all the cereal is well coated with the marshmallow mixture. The consistency should be sticky but not overly wet. -
Shape the Ghosts
Using buttered hands, take small amounts of the mixture and shape them into ghost forms. Aim for about 3 inches long and give them a rounded top. -
Coat in Chocolate
Melt the white chocolate or candy melts according to package instructions. Dip each shaped ghost into the melted chocolate, ensuring they are fully coated. Let any excess chocolate drip off. -
Decorate
While the coating is still wet, use chocolate chips or black icing to create eyes and mouths on the ghosts. Be creative with the designs! -
Set and Serve
Let the chocolate coating set completely before serving. Enjoy your spooky Rice Krispie Treat Ghosts at your next Halloween celebration!
Tips for Success
- Watch the Heat: Be careful not to overheat the butter and marshmallows; low and slow is key to avoiding burnt marshmallows.
- Use Non-Stick Spray: Lightly spray your hands with non-stick cooking spray to make shaping the ghosts easier and less sticky.
- Chill to Set Quickly: If you’re in a hurry, place the coated ghosts in the refrigerator for a few minutes to help the chocolate harden faster.
- Maintain Size Consistency: Try to keep all ghost shapes consistent in size for even coating and an appealing look.
- Experiment with Add-ins: For a different flavor, consider adding a pinch of cocoa powder to the marshmallow mixture or some Halloween-themed sprinkles before shaping.
Easy Variations
- Chocolate Rice Krispie Treat Ghosts: Use chocolate Rice Krispies for a richer flavor base.
- Pumpkin Spice Ghosts: Add pumpkin pie spice to the melted marshmallow mixture for a festive fall flavor.
- Nut-Free Option: Ensure all ingredients are nut-free to cater to those with nut allergies, especially the chocolate types used for coating.
- Dairy-Free Ghosts: Substitute butter with coconut oil and use dairy-free chocolate for a vegan version.
- Decorate Differently: Try using candy eyes instead of chocolate chips for a fun twist on the ghost’s appearance.
What to Serve with Rice Krispie Treat Ghosts
- Hot Chocolate: The sweetness of the ghost treats pairs wonderfully with a warm cup of hot chocolate, especially for chilly Halloween evenings.
- Popcorn: Add a festive touch by serving caramel popcorn alongside your ghosts for a crunchy contrast in texture.
- Fruit Platter: A colorful fruit platter can balance out the sweetness, making for a well-rounded treat table.
- Halloween Themed Drinks: Consider spooky punch or themed cocktails (or mocktails) that can enhance the festive atmosphere.
- Other Treats: Serve with other Halloween-themed treats like cupcakes or cookies to create a varied dessert spread.
Storage and Reheating
- Refrigerator Storage: Keep the Rice Krispie Treat Ghosts in an airtight container at room temperature for up to 3 days.
- Freezer Storage: For longer storage, you can freeze the ghosts. Wrap each one tightly in plastic wrap and then place them in a freezer-safe bag for up to a month.
- Best Reheating Method: If stored, let them come to room temperature when ready to serve. You can also warm them slightly in the microwave for a few seconds to regain some of their original texture.
- Preserve Texture: To maintain their soft and chewy consistency, avoid refrigerating for extended periods.
Common Mistakes to Avoid
- Don’t Overmix: Stir too aggressively after adding the Rice Krispies, as this can lead to a tough texture instead of soft and chewy treats.
- Inadequate Coating: Make sure to coat the ghosts thoroughly with the chocolate to prevent them from becoming too dry.
- Skipping the Butter: Butter is crucial for flavor and to keep the marshmallows from burning, so don’t eliminate it.
- Rushing the Cooling Process: Allow the coated ghosts to set completely before handling; rushing this can result in messy, unshaped treats.
Rice Krispie Treat Ghosts: Background & Cultural Inspiration
Rice Krispie treats date back to the 1930s when they were first introduced as a simple dessert using Rice Krispies and marshmallows. This type of sweet treat has evolved over the years, especially around holiday seasons, leading to fun variations like our Rice Krispie Treat Ghosts. Halloween traditions in the United States often include themed treats that are fun and visually striking, and these ghostly snacks perfectly fit that mold. The playful shapes and ease of preparation make them a beloved choice for Halloween festivities, reflecting the spirit of creativity and community during this time.
Frequently Asked Questions
Can I make these treats ahead of time?
Yes, you can make Rice Krispie Treat Ghosts a day in advance. Just store them in an airtight container to keep them fresh.
What if I don’t have mini marshmallows?
Regular marshmallows can be chopped into smaller pieces if mini marshmallows are unavailable.
How do I make them less sticky?
Using buttered or oiled hands while shaping the ghosts can help reduce stickiness and make handling easier.
Can I freeze them?
Yes, you can freeze the treats. Just wrap them individually and store them in a freezer-safe bag.
What types of chocolate can I use for coating?
You can use white chocolate, vanilla candy melts, or colored candy melts for a fun decorative touch.
Final Thoughts
Making Rice Krispie Treat Ghosts is not just simple but also a delightful way to celebrate Halloween with family and friends. Their easy preparation allows you to involve kids in the kitchen, and the end result is both playful and tasty. These treats are sure to be a hit at your next Halloween event, bringing smiles to everyone who sees—and tastes—them. Give this fun recipe a try and watch your loved ones enjoy these spooky treats!












